Lesson 2 – Exploring CO2 to Better Understand Ocean Acidification
 Description: This lesson walks students through experiments that will help them become familiar with carbon dioxide (CO2). In particular, these experiments aim to provide context for the role of carbon dioxide in global climate change and ocean acidification. Therefore, students should come away with an understanding of the natural and anthropogenic sources of CO2 as well as the interaction between carbon dioxide and water. These experiments are designed for small groups to rotate through different stations in a round-robin set-up.
Objectives
Course: Life Science, Integrated Science, STEM, BioChem, Marine Science
Unit: Ocean Acidification, Ecology, Biogeochemical Cycling
See the NGSS buttons in the left-hand panel of this page for an overview of the standards addressed in this lesson. Also, please see the documents on the Standards Addressed page for all NGSS, WA State (Science, Math and Literacy), and NOAA Ocean Literacy Education Standards connections. To give you a broad, big-picture overview, in addition to the aligned objectives linked above, for this lesson, here is an overview of:
What Students Learn
- CO2 is a common gas produced through cellular respiration, combustion and many chemical reactions.
- CO2 is a testable component in a very large system of many biotic (living) and abiotic (nonliving) components on land, in the air and in the water.
- CO2 is different than other relatively common gases – it is heavy and when it enters water it changes (a chemical reaction takes place).
What Students Do
- Students use inquiry to explore the properties of carbon dioxide.
- Students find that carbon dioxide is fairly easy to obtain, to experiment with and to measure.
Instructions
PACING GUIDE: one to two 50-minute periods, or on 90-minute period.
The purpose of these preliminary experiments is for students to become familiar with carbon dioxide (CO2). In particular, these experiments aim to provide context for the role of carbon dioxide in global climate change and ocean acidification. Therefore, students should come away with an understanding of the natural and anthropogenic sources of CO2 as well as the interaction between carbon dioxide and water. These experiments are designed for small groups to rotate through different stations in a round robin set-up.
Introduction and Advanced Prep
Carbon dioxide is a naturally occurring gas in the earth’s atmosphere important to many biological processes. In the natural carbon dioxide cycle, the production and fixation processes for CO2 are in equilibrium. Prior to human interference, atmospheric CO2 levels maintained a fairly stable level of about 280 ppm (parts per million). However, since the Industrial Revolution, human activity has produced more CO2 than natural fixation processes are able to remove from the atmosphere. Thus, human activity has caused a net increase in CO2 levels. Since the 1800’s the atmospheric carbon dioxide level has increased to about 400 ppm. The rate of this change is greater than ever before observed in history, as measured through methods such as ice core samples1. Throughout these lessons, we will discuss the effect of this increase, focusing specifically on the earth’s oceans.
There are two recommended options for Lesson 2.
A) Allow students to design their own inquiry investigation exploring properties of CO2. Give them a list of materials such as yeast, sugar, water, baking soda, vinegar, soda, dry ice, bromthymol blue (BTB), universal indicator, etc. to use and then guide them through developing their question and experimental plan.
B) Lead students through a lab rotation that considers the following questions:
-
- Where does CO2 come from naturally?
- Which human activities, starting during the Industrial Revolution, produce large amounts of CO2?
- What happens to water when CO2 levels in the air surrounding the water increase?
For either of these options, we recommend a couple of quick demonstrations to engage and remind students of what they know and what they have questions on. These two demonstrations should help students with two important concepts going into these lessons.
- CO2, while a seemingly harmless substance, has a dramatic effect on pH.
- CO2 sinks and falls readily to the ground and if in the atmosphere above the ocean, will fall into the ocean.
Demonstrations (Teacher-Led)
- Visual pH scale – use the steps below to demonstrate the effect CO2 has on water. Or use this demonstration designed by Flinn Scientific.
- Take 7, 400 mL beakers. Fill with water.
- Add universal indicator to each to achieve a nice green color in each beaker.
- The middle beaker will stay neutral. With your gloves and protective eyewear on, add 1 or 2 drops of 0.1 M HCl to the beaker to the left of center, 3-4 drops into the next beaker to the left, 5-6 drops HCl into the last beaker. You should have a sequence of colors from stronger acid to neutral.
- Using the same approach as in step 3, beginning with the beaker to the right of center, add drops of 0.1 M NaOH to create a series of basic solutions. The most basic (far right) beaker should be purple. This should complete your visual pH scale.
- Take a large flask (2L if possible) and fill 3/4 full with water. Add indicator. Add NaOH until it reaches purple. Drop some chunks of dry ice (CO2) into the flask. Remember to use appropriate safety techniques when handling dry ice. Hold the flask above the visual pH beakers and watch the CO2turn the flask from purple to dark orange demonstrating the dramatic pH change. Typically you can get dry ice from your local grocery store or fish market. If you do not have dry ice, you could use some other source of CO2 (such as that produced from baking soda and vinegar).
- Balloon drop: Take a small flask and drop a small pellet of dry ice into it (~3g) (again use appropriate dry ice safety techniques). Cover the flask with a balloon. Let the balloon fill, then tie it off. Meanwhile, fill another balloon with air to the same volume as the CO2 balloon. Hold them high and let them both drop. See the CO2 balloon reach the floor first. Ask students to consider why one balloon would fall faster than the other.
Student Experimentation
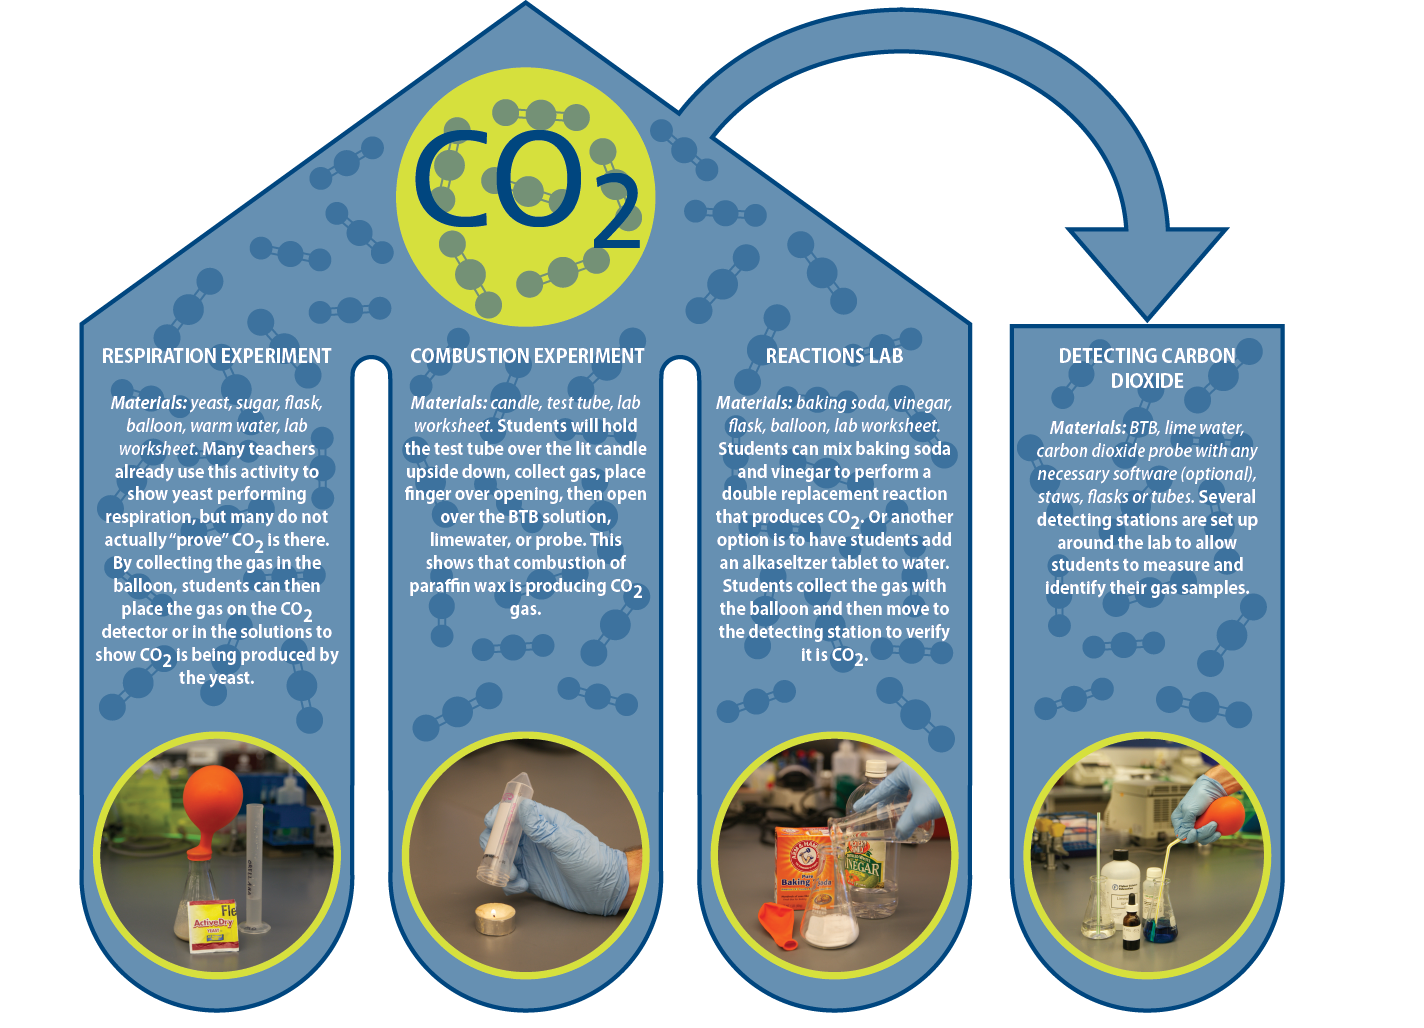
After the demonstrations, students should begin their experiments. Follow either Option A or B as stated above. For Option B, please follow the directions in these documents:
- Chemical Reactions Lab (Google Doc | Word Doc)
- Combustion Lab (Google Doc | Word Doc)
- Cellular Respiration Lab (Google Doc | Word Doc)
- Detecting Carbon Dioxide Lab (Google Doc | Word Doc)
For large classes, these labs can be set up in duplicate so that you have 8 stations set up in your lab. If you have space, specifically having multiple “Detecting CO2” stations will prevent any bottleneck. All needed materials are listed in the above 4 documents for this lab activity. In addition, here is a compiled list of materials for your convenience.
Common Misconceptions – Students may think that a small change in pH is a small change overall. See below for a list of possible pH activities to help avoid this misconception. Also, a quick review on logarithms may be required to fully comprehend how an increase in CO2 emissions impacts pH. It is important for students to see that a change from pH 8.2 to 8.1 is a BIG deal. Here are some resources that we have found to be helpful for students completing this module:
- How We Use Logarithms – An excerpt and figure from University of Manitoba in Canada that helps students understand the difference between Linear and Logarithmic scales.
- A list of various pH resources
- Adaptations from the PhET project at the University of Colorado
- pH simulation student worksheet – PhET pH Intro (Google Doc | Word Doc)
- pH simulation student worksheet with more emphasis on math – PhET pH Intro too (Google Doc | Word Doc)
- pH simulation student worksheet – PhET Acids and Bases (Google Doc | Word Doc)
- pH simulation student worksheet with more emphasis on math – PhET Acids and Bases too (Google Doc | Word Doc)
- Please note that there are a lot of chemistry concepts that we purposefully left out of this lesson. For instance, Limewater and BTB, two indicators used in this lesson, have very interesting chemical properties. Originally, when developing these lessons, we considered teaching students why and how Limewater and BTB change in the presence of CO2. However, after field testing, we purposefully left this out in order to focus students’ learning on experiential understanding of Carbon dioxide as a phenomenon that is making great change in ocean water. The chemistry behind the reactions of Limewater and BTB were too complex to cover as part of a general class and not needed to achieve the main goal. If you are teaching this module as part of an Advanced Chemistry course, then you might want to have students work towards understanding the chemistry behind saturation curves, reversible indicators, precipitation reactions, etc.
Writing Scientific Arguments
This lesson offers a good opportunity for scientific writing. Specifically, using a “Claim-Evidence-Reasoning” prompt leads to further scientific understanding as well as gains in thinking and writing skills. Claim-Evidence-Reasoning is the format for writing a scientific argument that is part of Common Core standards. Here are two examples for incorporating this format into this lesson: Have students make a claim about whether or not burning wax is a combustion reaction. Students should cite the evidence that supports their claim (for this example: mostly the BTB change and/or Vernier CO2 probes if you used them). Students should reason through why a color change in BTB indicated the presence of carbon dioxide. You can also have them make a claim for what was required for respiration (i.e., sugar or no sugar), using the same structure. The above labs offer many good ways to introduce writing scientific arguments. Feel free to adapt your prompts to fit the labs the students completed. You completed
This completes the Instructional Activities for this lesson. Please move to Assessment via the Tab above.
Assessment
How will I know they know?
- Completed Lab Worksheets and/or Notebook:
- Were students able to appropriately document demonstration observations and conclusions in their lab notebook?
- Were students able to appropriately document experimentation in their notebook?
- Were students able to appropriately answer analysis questions from lab worksheets?
- Were students able to successfully provide Claim-Evidence-Reasoning for their experimental question?
- Survey purpose: This series of mini-survey helps us better understand student engagement over time, in relation to specific Next Generation Science Standards, for the purposes of program improvement. See below for more information.
- Mini-Surveys: As part of our effort to ensure quality STEM learning experiences, we invite you to participate in short, but informative surveys. You can complete one, all or any variation between. Here is a downloadable Teacher Overview to guide you through all surveys.
- A mini-survey is a short survey (1-3 minutes) that students and teachers will use several times over the course of the module. The questions are identical each time, so the same link can be used each time.
- Student Mini-survey link (https://www.surveymonkey.com/r/OA_StudentSurvey). Please provide 2-4 minutes for students to complete the mini-survey while in class. It should take most students one minute or so, especially after the first survey or two (because the questions remain the same).
- When prompting the students to take the survey at this timepoint (#1), please remind students that this survey covers information taught over the last two lessons. Here is an example prompt for students: Take this mini-survey while thinking of the lessons we completed on [Monday and Tuesday] that allowed you to:
- evaluate and map news articles and
- work in the lab to make and detect carbon dioxide
(Please remove and replace any necessary text above that helps your students think of what they have completed as part of this module.)
- When prompting the students to take the survey at this timepoint (#1), please remind students that this survey covers information taught over the last two lessons. Here is an example prompt for students: Take this mini-survey while thinking of the lessons we completed on [Monday and Tuesday] that allowed you to:
- Please complete the teacher survey while students are taking the mini-survey, or at the end of the day. Please take it on the same day the students take theirs (https://www.surveymonkey.com/r/OA_TeacherSurvey).
- Here is the entire Survey Teacher Guide that you can use when implementing these surveys. Thank you!
Resources
- Round Robin Lab – Chemical Reactions (Google Doc | Word Doc)
- Round Robin Lab – Combustion (Google Doc | Word Doc)
- Round Robin Lab – Cellular Respiration (Google Doc | Word Doc)
- Round Robin Lab – Detecting Carbon Dioxide (Google Doc | Word Doc)
- Round Robin Lab – Teacher Resource: Compiled List of Materials (Google Doc | Word Doc)
- University of Manitoba Excerpt on How We Use Logarithms (JPG)
- Compiled List of Useful pH Resources (Google Doc | Word Doc)
- Adaptation from the U of Colorado PhET Project – PhET pH Intro; PhET pH Intro too
- Adaptation from the U of Colorado PhET Project – PhET Acids and Bases; PhET Acids and Bases too
Accommodations
This lesson is written with multiple options for various student needs. Not all activities and worksheets need to be completed. Instead, look through the options above and match what is needed for your students. For instance, depending on your students’ previous lab experience, using Option A or Option B above can help to build and/or extend your students’ inquiry skills.
Extensions
Lesson 3 will build on the previous two lessons and will specifically introduce ocean acidification. However, depending on your students, and the amount of time you have in class, now might be a good time to walk students through this amazing three-minute animation – Trends in Carbon Dioxide. We will introduce it in lesson 5b. However, depending on your students and their background, it may be useful at the end of this lesson and/or at the end of lesson 3. Here is another terrific animation by NOAA to show the scale of our CO2 emissions and the connectedness of our Earth’s air, water and land. The Woods Hole Oceanographic Institute also has activities for students in Grades 5-12 to learn about the pH of the ocean. See here for a lesson on ocean acidification or view their website for more general information for K-12 teachers. There are more Carbon Cycle Resources posted in Lesson 5b and in Cool Finds and Resources. Many teachers more fully teach the carbon cycle once students have completed Lesson 5a and have their experiments up and running.
References
Many teachers and scientists participated in the creation of these lessons and content. Please view the list of credits for this work. For this lesson, these additional references are specifically noteworthy: 1. Honish, et al. The Geological Record of Ocean Acidification, Science 2 March 2012; 1058-1063. DOI:10.1126/science.1208277 2. Visual pH scale and balloon drop demonstrations adapted from activities by Michael Walker at Olympic High School in Bremerton, WA.