Aquaponics – Introduction
 see.isbscience.org/curriculum/community-contributed/aquaponics-introduction/
Introduction
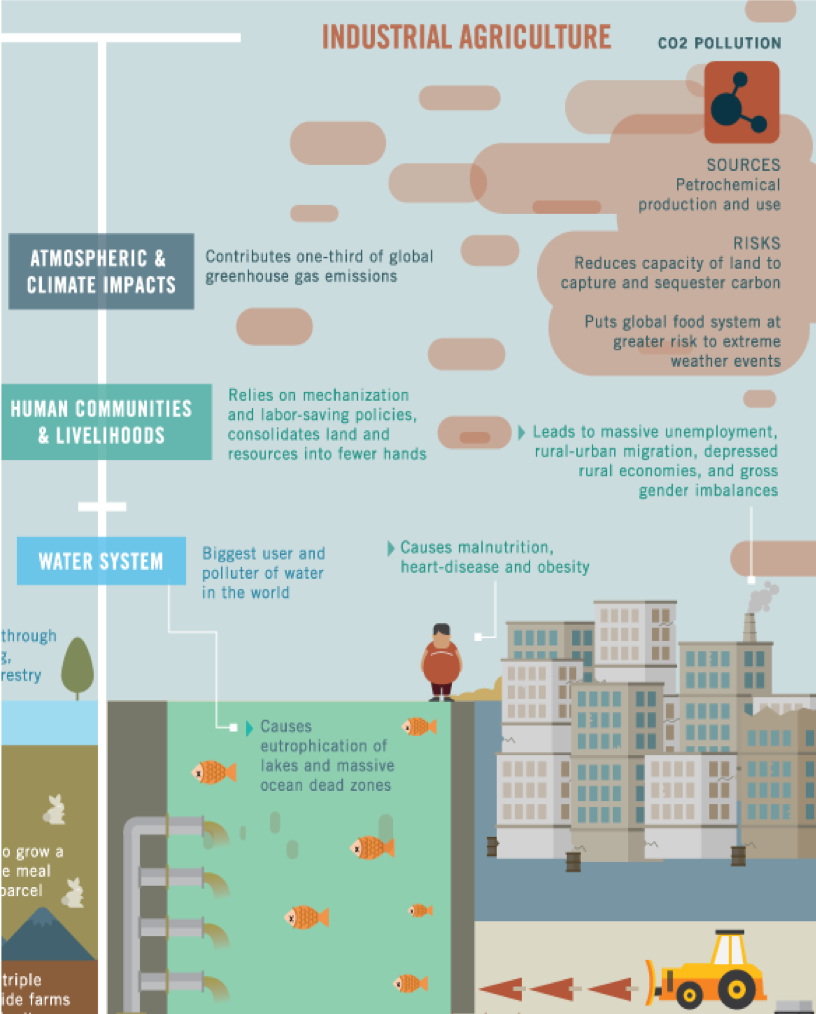
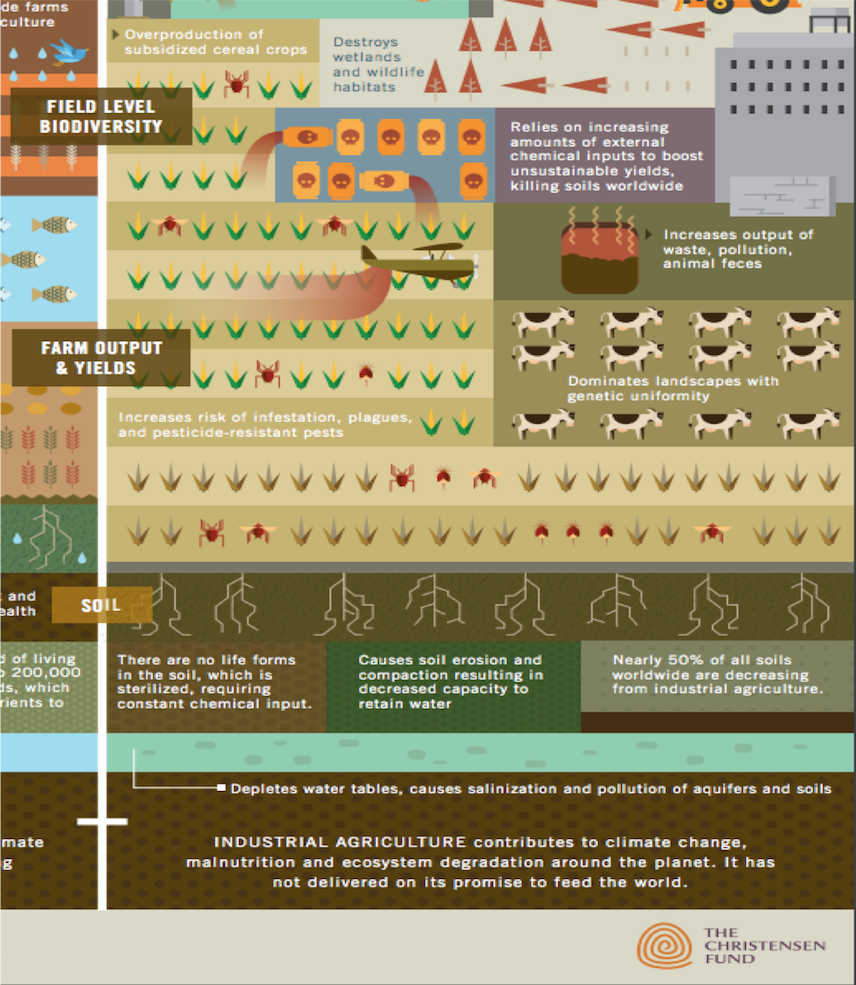
Diminishing arable land, water shortage, and expected population growth to 10 billion portend a catastrophic food security crisis by 2030. This threat requires a dramatic reduction of the environmental footprint of agricultural practices. A paradigm shift to the food supply chain is necessary to meet an expected 70% or more increase in food demand.
Modern Agricultural practices such as monocropping, chemical fertilizers/pesticides, and genetically modified produce could be used to meet this growing demand. However these practices are unsustainable, costly, and harmful to the environment.
Negative impacts of unsustainable agriculture includes:
Poverty, Food cost, and Food Security
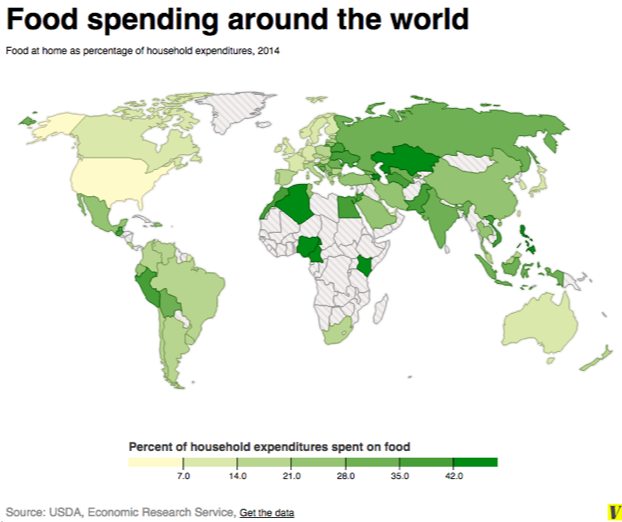 The cost and availability of food is an additional concern. Spending of household income on food varies dramatically by country. When international food availability decreases or food cost increase the impoverished will be impacted the most. Consider the graph to the right showing the amount of household income spent on food by country.
Why is food cost in the United states so much lower than the rest of the world?
Aquaponics: A sustainable solution to our global food crisis
It’s a system that combines aquaculture (fish farming) and hydroponics (growing plants in water) in a mutually beneficial environment. The fish excretion is broken down by nitrogen fixation, which provides nutrients essential to plant growth. This process serves as a natural fertilizer for the plants. In return, the plants help purify the water for the fish. Up to 98 percent of the water is recycled in this system.

 This semester you will be maintaining a small scale aquaponic system using a design provided to you by your teacher. Next semester you will be encouraged to improve upon this design and create your own. Many of the concepts involved in this lab will be learned throughout the school year so do not get discouraged if you get lost or are confused! Research and ask questions!
The 3 main components of an aquaponics system are: Plants, Fish, and Bacteria
 Plants: You will grow a leafy vegetable of your choosing for this project.
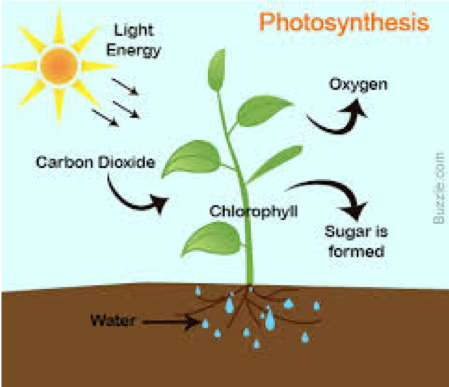
Plants require light, water, a substrate to attach to, and nutrients such as nitrogen through nitrites and nitrates to flourish and metabolize. The waste produced by plants is oxygen.
Fish: Your aquaponic system will use fish commonly found at pet stores such as goldfish, minnows, and goldfish.
Fish require food such as algae flakes and clean oxygen rich water to survive. The waste produced by fish is ammonia. High levels of ammonia are toxic to fish.
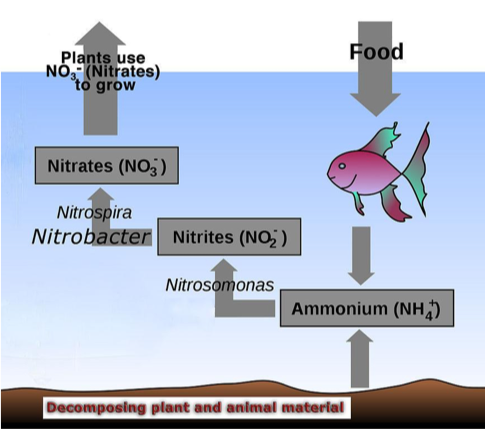 Bacteria: Bacteria are essential for productive soils and aquaponic systems. Bacteria in soils and aquaponic systems metabolize ammonia and convert it into nitrites and nitrates usable by plants. These bacteria are known as nitrifying bacteria.
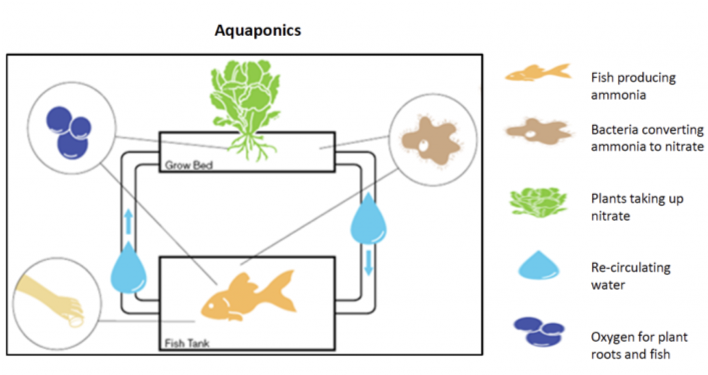
Examine the image of the aquaponics system you will be building below and use the information above to answer the following questions.
1.Identify the chemical inputs and outputs for each of the following
a. Fish b. bacteria c. plants
2.Identify the path of nitrogen transformation in an aquaponics system
3. Examining the overall aquaponic system. How much and what type of energy/inputs go into the system? Exit the system?
Model of your aquaponic system

Directions
Second day: Final Assembly, Initial Water Testing, and Data Collection Set-up
- Make a copy of this file, share it with your group mates, AND PUT EVERYONE'S NAMES IN THE TITLE!
- Every Monday and Friday in class you will:
- Test the water quality and temperature of your system and record data in your google sheet
- Record observations on your plants and fish
- Make necessary changes to your system to maintain the nitrogen cycle and healthy plants/fish
- Reflect on any changes you observe in your nitrogen cycle graph (see the nitrogen cycle graph tab on your groups spreadsheet)
 Let's make the first of the water content measurements you will make. You will test the high pH, Nitrite, Nitrate, and Ammonia contents of your system by using an API freshwater master test kit. Note: API test strips can alternatively be used. API freshwater master test kits were selected for this experiment because of low cost and high frequency of water testing. Photo credit: API
- Obtain an eye dropper/pipette and an API freshwater master kit. Follow the directions outlined for each test in the chart below and record your results in your group spreadsheet. Directions are from API freshwater master test kit instructions booklet
| Low pH
(used for pH of 6 - 7.6) |
High pH
(Used for pH of 7.4 - 8.8) |
Ammonia | Nitrite | Nitrate |
| 1. Fill test tube with 5 ml of water.
2. Add 3 drops of low pH test solution
3. Cap & invert the test tube several times
4. Read and record results using color chart |
1. Fill test tube with 5 ml of water.
2. Add 5 drops from of high pH test solution
3. Cap & invert the test tube several times
4. Read and record results using color chart |
1. Fill test tube with 5 ml of water.
2. Add 8 drops from Ammonia Test Solution #1
3. Add 8 drops from Ammonia Test Solution #2
4. Cap & shake for 5 seconds.
5. Wait 5 minutes for the color to develop.
6. Read and record results using color chart |
1. Fill test tube with 5 ml of water.
2. Add 5 drops of Nitrite Test Solution.
3. Cap & shake for 5 seconds.
4. Wait 5 minutes for the color to develop.
5. Read and record results using color chart |
1. Fill test tube with 5 ml of water.
2. Add 10 drops from Nitrate Test Solution #1
3. Cap & invert tube several times
4.Shake the Nitrate Test Solution #2 for 30 seconds.
5. Add 10 drops from Nitrate Test Solution #2, cap, & shake for 1 minute
6. Wait 5 minutes for the color to develop
7. Read and record results using color chart |
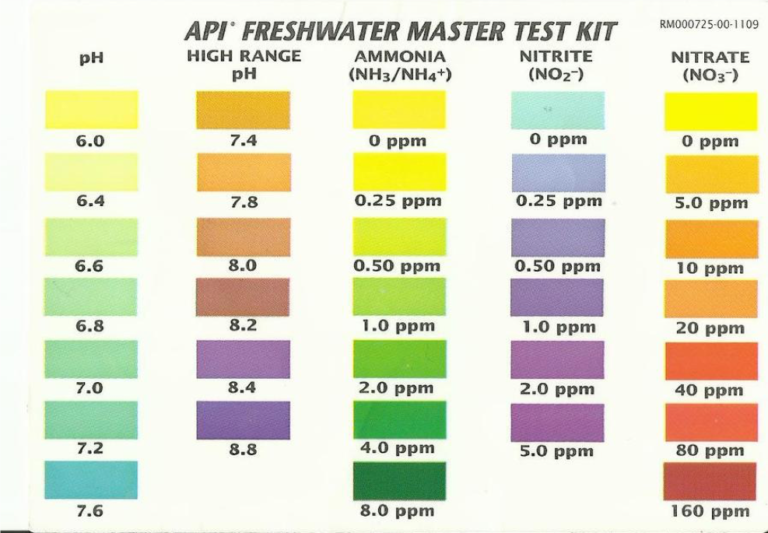
Color Chart obtained from API freshwater master test kit instructions booklet
- Obtain a thermometer, test, and record the temperature of your system.
- Examine your results. Did your water test demonstrate that the water is safe for fish? How do you know?
- If, and only if, your water is safe, add two small goldfish to your system using the floating method of fish acclimation. Why is it so important to acclimate your fish before adding them to the water?
Floating method:
- Float bag of fish in the system for 15 minutes
- Cut open the top of the bag to leave an air bubble. Allow the cut bag to float. Add half of a cup of water from your aquaponic system to the bag, wait 4 minutes, then add another half of cup, wait 4 minutes, and repeat until the bag is completely full.
- Discard half of the water in the bag and repeat step II
- Release the fish into the tank using a net. Remove plastic bag.
- Obtain a small piece of sponge and add nitrifying bacteria to it as recommended by the nitrifying bacteria bottle (Using API Quick Start with 1 gallon mason jars requires 1 ml of nitrifying bacteria). Place the sponge piece into the grow substrate of your system and make sure the sponge is fully submerged in your water. Why are nitrifying bacteria essential for the success of your system? Why are they kept on a sponge in the growing media?
- If your seedlings have grown roots that are at least one inch long remove your plant seedlings and delicately place them into the clay substrate of your system. Try to have only the roots of your seedlings touch the water in your cup. Submerged plants would have a difficult time establishing themselves in your system (plants can drown too!).
- It is essential that you make no changes until your system has completed nitrogen cycling!
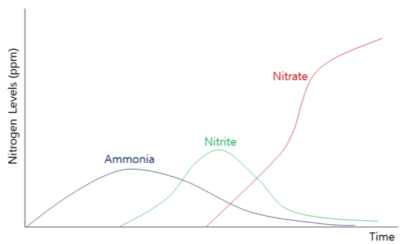 As your fish, nitrifying bacteria, and plants engage in their first nitrogen cycle you should observe the following sequence of changes:
I. Ammonia will be first to appear
(why would this be?)
II. Nitrite will appear and Ammonia will begin to decrease (what is causing this to happen?)
III. Nitrate will appear and increase as Nitrite and Ammonia decrease to zero (what uses Nitrate?)
Continue to test and record data (and feed your fish!) until you receive a reading of 0 ppm Ammonia, 0 ppm Nitrite, and a reading of greater than 0 ppm Nitrate. Your groups Nitrogen cycle graph will look similar to the diagram above when this is achieved. (Why is it important to wait for the nitrogen cycle to complete before making any changes to your system?)
Once full nitrogen cycling is complete in your system progress to the third day directions below.